 When setting up a new WordPress website the default Permalink setting looks something like this http://www.HangTenSEO.com/?p=123.
The problem with this structure is visitors will have a hard time remembering the actual URL since the URL contains just a number. It is also not very SEO friendly, since the actual URL will not contain the keywords you’re looking to rank for.
I see a lot of WordPress websites where the URL has dates in it.
Is this a good permalink setting?
Normally the sites that should employ this type of PERMALINK structure would be news sites, where a date might help in organizing material. It has also been known to lower traffic and CTR from older search results. When people see an older date in the URL, they may not click on the link, since they think the link is old or out of date.
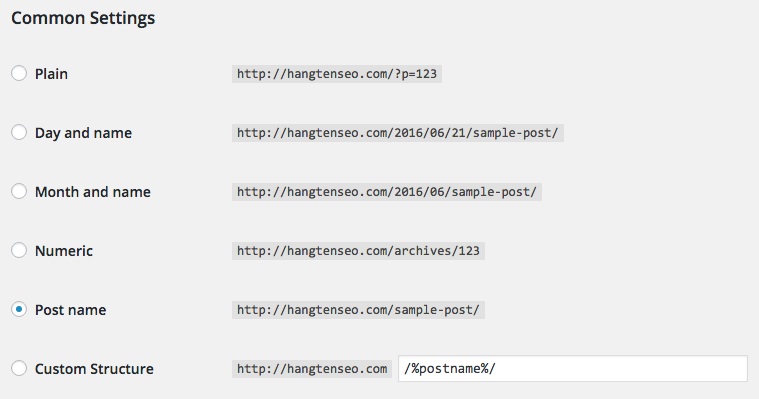
The most common and more practical way to change the setting is by using /%postname%/ instead. By using /%postname%/ you’re making the URL short, understandable, and highly SEO-friendly.
What are the downsides to this approach?
- By using the /%postname%/ you are limiting the ability to reuse the title for another post. This however isn’t a likely scenario or really should be practiced.
- REALLY IMPORTANT: If you already have an existing Website, changing your permalink URL structure will cause all your backlinks to give errors, greatly lowering your traffic. (Not Good)
OK I like this, how do I change the WordPress Permalink Settings?
- Log into your website
- Select Settings–>”Permalinks” from the sidebar menu
- Select the “Post name” radio button option
- Click the [Save] button to save changes
<– CAUTION –> Remember changing your Permalink structure will cause 404 errors you have backlinks to the old Permalink structure. <– CAUTION –>
OK this sounds great for new WordPress websites, but what if I already have the default permalink selected or have a permalink with the month/year in it. Can I change it?
The answer is a resounding YES! You’re in luck because I have just done all the leg work for you. That said, you will need a few tools.
1. You will need a FTP (File Transfer Protocol) tool like FileZilla to transfer files.
2. You will need a text editor
3. You will need Yoast’s Generate Redirects Tool to generate the redirect code you will be adding to a the file called .htaccess
Great I now have all the tools I need!
Well, maybe. You see if you are working on a Mac, the default is not to show hidden files like the one you will be editing. This may also be a problem on Windows. Since I don’t own a PC, I am just going to address a Mac solution.
.htaccess
The main file you need to modify is called .htaccess. Normally, files you need to modify are visible through the Mac Finder. Since .htaccess is a system file beginning with a “.” it is hidden from view. The Mac doesn’t make it very easy to just unhide a file.
How To Display Hidden Files On A Mac
There are two ways to show the hidden files on your Mac. First, the hard way: Using the Terminal. “Terminal” is a program that advanced users typically use… If you click Go in the apple menu bar (finder), and then you click Utilities, you will come to a folder that has the Terminal application.
- Start Terminal by double clicking the icon.
- Next, Type the following into the terminal:
defaults write com.apple.Finder AppleShowAllFiles YES
Press Enter, then type:
killall FINDER
Press Enter again.
A better approach is to use an application to do this. I like the application called Show Hidden Files.
Once installed you simply click a button to show and unshow hidden files.
OK so now we have all the tools we need right?
We should be good to go now.
- Step 1. Open one of your current blog posts (with the older link structure) in a new tab or window.
- Step 2. Open a 2nd tab or window and open the WordPress Admin panel for your website.
- Step 3. Use FileZilla or some other FTP program to access the .htaccess file in your website directory. The file should be located under the Content/ directory. Once located transfer the file to your computer for editing. (Make sure you make a backup of the file)
Note: If you can not locate the .htaccess file, it is probably because it is hidden. In Filezilla you can select Server–> Force Showing Hidden Files to display all hidden files. - Step 4. Use the program Show Hidden Files or some other program to display the hidden files on your computer.
- Step 5. Use the Content Forest Generate Redirect Tool to generate the code that will be added to the .hcaccess file.
- Step 6. Use a text editor to modify the .hcaccess file and add the line of code that Yoast’s tool creates. Add the line of code to the beginning of the .hcaccess file.
- Step 7. Copy the file back using FTP.
- Step 8. In your open tab or window with your website’s admin panel, select Settings–>Permalinks from the side bar. (The “Permalinks Setting” Screen should display)
- Step 9. Choose the “Post name” radio button. It should add “/%postname%/” to thecustom structure text box.
- Step 10. Select the tab or window with the blog post that has the older link structure and refresh the window. If everything worked correctly, the new format for the URL should display. If you did something incorrectly a 404 page should display.
Hopefully this will help your SEO in the future and let you capitalize on better clicks.


