As an avid WordPress user and Divi theme user, having a child theme is really important to help prevent your customized theme coding from being overwritten when there is a theme update. It is essentially best practice to create a child theme to accompany the parent or main website theme. The purpose of a child theme is to allow you to make changes and adjustments without affecting the original theme’s code.
Having a child theme also protects your Google tags and tag manager setup from being overwritten.
How To Create A Child Theme For Divi
- Step 1: Get your FTP File Transfer Protocol information (You will need FTP access to your website’s server)
- Step 2: Connect to your website server via FTP (An excellent FTP program I use is called Filezilla)
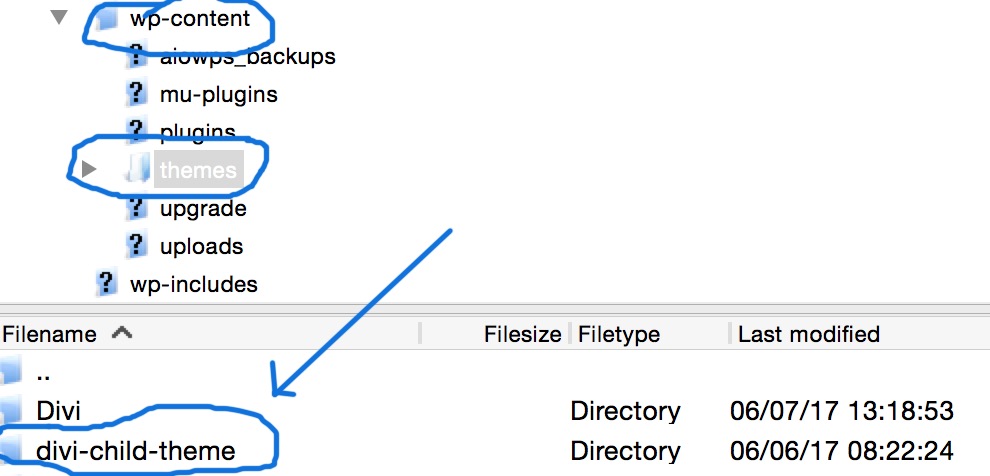
- Step 3: Create a new folder in the wp-content –> themes called “Divi-child”
- Step 4: Create a file called styles.css and add the code for it below
- Step 5: Transfer the new “style.css” file to the newly created “Divi-child” folder using FTP
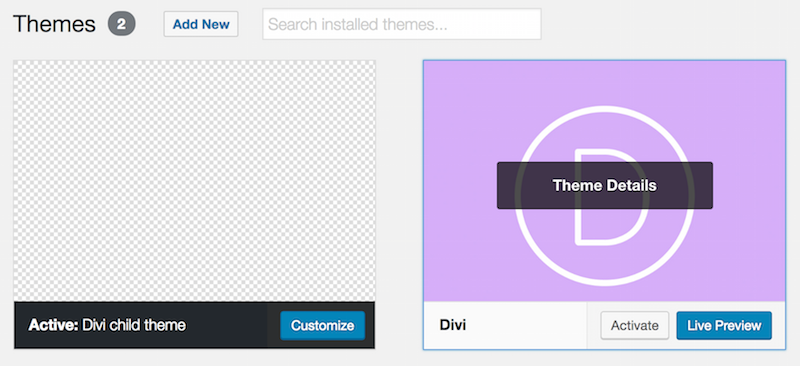
- Step 6: Log into your WordPress website via “your site’s url” /wp-admin and open up Appearance –> Themes menu option
- Step 7: Once the Themes window is open click on the Child Theme to activate it.
Getting Your FTP Information
In order to transfer files from your computer to a website server you need a program that can FTP information. FTP stands for File Transfer Protocol and allows you to communicate and transfer files between your desktop or laptop and a website server. I like to use a program called Filezila, which is a free FTP program.
To make a connection to the server using Filezilla requires a few bits of information including
- Host – The host is usually your websites URL or IP address
- Port – Port is usually 2 to 4 numbers, for example the port for WPEngine’s servers is 2222
- User Name – This is a FTP user name
- Password – This is the FTP user name’s password
Most of my clients don’t have this information handy, so I will often have to setup a FTP account. To do so I will log into the client’s website control panel (Example Godaddy or WPEngine) and setup a new FTP account. Once the account is setup, you just need to gather the Host, Port, User Name and Password information.
Note: If you aren’t sure how to setup a FTP account, you can usually contact the website server provider and have them setup one for you.

Connect to your website server via FTP
I am going to assume that Filezilla is being used. When you first open up Filezilla there is a quick connect method that allows you to quickly connect to a website’s server by just entering in Host, User Name and Password and Port information.

If you have entered the information correctly and clicked the Quickconnect button, a connection between your desktop or laptop and the server should be established.
You are now able to transfer files to and from your computer to the server. In our case we will be transferring files to the server.
Create A New Folder On The Website’s Server
After you have logged into the server with your FTP program of choice, you will need to create a new folder in the wp-content –> themes directory called Divi-child or Divi-child theme. Either one will work. The new Divi-child directory is where you will be transferring the child theme file to.

Create a file called style.css
On your desktop or laptop you will create a file called style.css (Not Styles.css – my bad). Use a text editor to create the file. Apple computers come standard with a default text editor called Textedit, but any text editor will do.
Paste the following code into the style.css file, replacing the Author and Author URL with your own information.
/*
Theme Name: Divi Child
Description: Divi Child
Author: Your Name or Your Company Name
Author URI: Your Company’s Website URL
Template: Divi
Version: 1.0.2
*/
@import url(“../Divi/style.css”);
/* =Theme customizations
——————————————————- */
Save the changes.
Transfer The New “style.css” File To The “Divi-child” Folder Using FTP
After successfully creating the style.css file, simply transfer the newly created file to the “Divi-child” directory. You may have to wait for 5 to 10 minutes for the changes to be recognized. The website server may have cached the directories and changes to them might not be present. If you have the option to flush the server cache, that is always a good choice to speed things up. If not, waiting about 5 to 10 minutes should work.
Log Into The WordPress Using The Admin Account
Log into WordPress using the url Your Website URL/wp-admin. Once logged in, click on the Appearance–>Themes menu option.
If everything was done correctly in the previous steps you should see a theme called Divi Child.
Click on the Divi Child theme and Activate it. When you’re done, it should look something like below.

Check the website for anything unusual. You may have to re-add the menu, but other than that, everything else should be good.
Now next time you update the theme you will not have to worry about any changes being overwritten.


Thanks for this helpful tutorial! One small error I ran into: the file to upload should be called “style.css” instead of “styles.css”. Thanks again!
Hi Allen,
Whoops. You are correct. Thanks for that catch. style.CSS and not styles.css
Followed instructions and the child theme appears, but the site deconfigures terribly if I switch to the child theme. What can I do?
The style.css shown in the example is missing the import. It should read:
/*
Theme Name: Divi Child Theme
Theme URI: https://www.elegantthemes.com/gallery/foxy/
Description: Divi Child Theme
Author: Elegant Themes
Author URI: https://www.elegantthemes.com
Template: Divi
Version: 1.0.0
*/
@import url(“../Divi/style.css”);
/* =Theme customization starts here
——————————————————- */
Ok, after doing some research, I got my Parent theme settings to work on the child theme by creating a php file on the same child theme folder as the style.css file, with the following code:
<?php
//* Code goes here
add_action( 'wp_enqueue_scripts', 'enqueue_parent_styles' );
function enqueue_parent_styles() {
wp_enqueue_style( 'parent-style', get_template_directory_uri().'/style.css' );
}
This fixed everything.
Hi Yoshi,
Normally when I add a child theme I only have to update the menu. I haven’t run into any styling issues.
Thank you Yoshi! I had the same issue. This fixed it!
I’m wondering what code goes in “code goes here”
thank in advance
should I name the php file “functions.php”?
Hi Tom,
Another great article! Just checked out the google analytics article before this one. Lots of great information! Thanks again!